
Time: 45 minutes
Analyzer mode: Manual operation
Wear
personal protective equipment.
Use universal precautions.
|
|
||
|
Time: 45 minutes Analyzer mode: Manual operation |
Wear
personal protective equipment. |
|
At the Menu Panel, select Maint., then select ISE Operation.
Unscrew the acrylic cover at the position where the electrolyte sample is dispensed at the left front of the analyzer.
Loosen the screw retaining the stainless steel cover at the top of the ISE unit, and remove that cover by sliding it toward you.
At the ISE Operation window, next to Final operation, enter 16 in the field next to Pure water position.
Select container 1 setting for 10-mL tube.
Fill a 10-mL tube with deionized water and place it on the CTT tray in position 16.
At the ISE Operation window, next to Final operation, select Execute. Water is dispensed into the ISE module.
To dissolve the crystals attached to the liquid-supply nozzle, let it stand for about five minutes.
On the ISE Operation window, next to Cellpot drain, select Execute. The water in the dilution bowl drains.
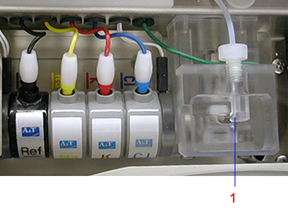
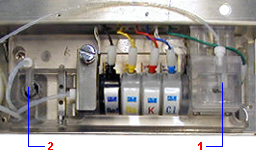
Wipe the water or dirty parts around the liquid-supply nozzle (1) using a wet cotton stick or a similar material.
At the ISE Operation window, enter 5 in the Bufferprime Times box, then select Execute.
Select Yes when prompted to execute buffer prime. Priming is performed.
 CAUTION
Be careful not to scratch the nozzle. Damaging the nozzle may cause faulty results.
Using a blunt object, like a disposable pipet, carefully scrape the crystals that are attached to the waste-drain nozzle (2).
At the ISE Operation window, enter 4 or 5 in the Bufferprime Times box, then select Execute.
IMPORTANT
Verify that no buffer collects in the wash block. If there is water, crystals or other matter may be clogging the drain.
Replace the stainless steel cover of the ISE unit by sliding it into place, then secure the retaining screw.
CAUTION
When sliding the cover, be careful not to scratch the tubes and dilution bowl. Also, when fastening the screw, verify that the cover is not caught in the groove and is not loose.
Reinstall the acrylic cover and tighten the screws.
At the ISE Operation window, select Execute to the right of the word Initialize.
Select Yes when prompted to execute arrangement.
At the ISE Operation window, select Exit.
Select Yes when prompted.
Perform calibration and run controls.