
Time: 5 minutes
Analyzer mode: Manual operation
Wear
personal protective equipment.
Use universal precautions.
|
|
||
|
Time: 5 minutes Analyzer mode: Manual operation |
Wear
personal protective equipment. |
|
Replace the electrodes if the slope is incorrect or calibration cannot be achieved.
The acceptable ISE slope must be between 45.0 and 63.0. Slopes beyond this range are flagged as shown in the following table. A flagged slope fails the calibration. The slope limits are defined in the ISE Parameter Of Setting window.
|
Mark |
ISE Slope Range |
|
H |
> 65.0 |
|
h |
63.1 to 65.0 |
|
l |
38.0 - 44.9 |
|
L |
< 38.0 |
At the Menu panel, click Maint., then select ISE Operation.
Unscrew the acrylic cover at the position where the electrolyte sample is dispensed at the left front of the analyzer.
Loosen the screw retaining the stainless steel cover of the top of the ISE unit, and remove that cover by sliding it toward you.
Disconnect the electrode connectors.
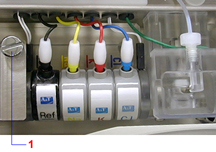
Remove the thumbscrew (1). This releases the plate that secures the electrodes and the block containing the electrode can be removed.
Remove the electrode to be replaced.
NOTE
Make sure that the K and Na electrodes have been conditioned. When Cl and Ref electrodes are taken out of their packaging, they are wet. Wipe the Cl electrode thoroughly, and wash the Ref electrode using water.
Assemble the new electrodes in the correct order.
Set the electrodes in place, paying careful attention not to leave a space between them. Make sure that there is an o-ring between each electrode and make sure that the ridges on the side of each electrode fits into the depressions on the side of the electrode next to it.
Fasten the thumbscrew while holding down each electrode with the retaining plate.
Insert the electrode connectors.
 CAUTION
If there is space between the electrode connections, the plate retaining the electrodes cannot be closed. If you cannot close it, move each electrode left and right little by little. Do not force the electrode. Fasten the thumbscrew tightly. If the retaining plate loosens during measurement, liquid could leak, causing a problem with the instrument.
At the ISE Operation window, select Execute to the right of the word Initialize. Select Yes when prompted to execute arrangement.
In the Bufferprime area, enter 3 into the Times field. Select Execute, then select Yes when prompted to execute buffer prime.
Verify that the liquid is discharged smoothly from the dilution bowl during priming. If the liquid is increasing without being discharged, there is a leak, an incorrectly positioned electrode, or a clog in the drain system. Immediately stop the instrument.
IMPORTANT
If clogging occurs, most probably the flow path is clogged inside the electrode. Remove the Na and K electrodes, and check them by transmitted light to see whether the flow path is clogged or not. You cannot do this for the Cl electrode due to its construction. When in doubt, even if you cannot find a problem by the above check, try replacing the electrode.
Mount the stainless steel cover of the top of the ISE unit by sliding it inside and fasten the screw retaining the cover.
NOTE
When sliding it, be careful not to scratch the tubes and dilution bowl. Also when fastening the screw, verify that the cover is not caught in the groove and is not loose.
Reinstall the acrylic cover and tighten the screws.
At the ISE Operation window, select Execute to the right of the word Initialize, then select Yes. After initialization is complete, select Exit, then select Yes.
At the Operation Panel, select Initialize.
At the Menu Panel, select Maint., then select ISE Operation.
At the ISE Operation window, select Execute to the right of the word Calibration, then select Yes when prompted to execute calibration.
NOTE
The electrodes may have to stabilize on the system before a successful calibration is achieved.