Time:10 minutes
Analyzer mode: READY
Wear personal protective equipment.
Use universal precautions.
|
|
||
|
Time:10 minutes Analyzer mode: READY |
Wear personal protective equipment. |
|
Clean inside the STT/CTT housing and RTT refrigerated housing once a month to remove accumulated sample, reagent, dust, condensation and other materials.
|
|
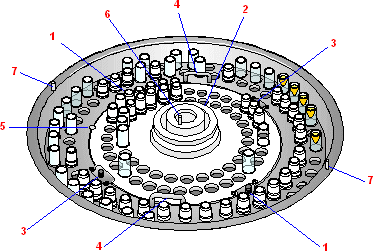
1 CTT NYLATCH FASTENERS 2 CTT HANDLE 3 STT NYLATCH FASTENERS 4 STT HANDLES 5 LOCATOR SCREW 6 LOCATOR PIN (CTT COVER) 7 LOCATOR PINS (STT COVER) |
Remove the Calibrator/Control Tray loader (CTT).
Lift the standard cover from the loaders.
Pull up on the two Nylatch fasteners (1) securing the CTT Tray loader in place.
Lift out tray loader by the center handle (2).
Remove the Sample Tray loader (STT).
Lift the Sample Tray evaporation cover.
Pull up the two fasteners (3) securing the STT Tray loader in place.
Lift the tray by the two metal handles.
Using lint-free towels, wipe the interior.
Replace the CTT and STT tray and covers.
Orient each tray loader to the locator screw (5).
Ensure the tray loaders are securely in position, then push the fasteners (1 & 3) in place.
Replace the STT evaporation cover, orienting it to the locating pins (7).
Replace the CTT cover, orienting it to the locating pin (6).
Remove Reagent tray loader 1 (RTT1).
Lift the cover off the reagent tray.
Loosen the white knob (1) in the center by turning it counterclockwise.
Lift the loader out of the refrigerated housing.
To wipe the interior, use lint-free towels.
To wipe the glass window of the reagent bar code reader, use lint-free towels.
Replace the Reagent Tray loader.
Ensure that it is securely in position.
Tighten the white center knob.
Replace the covers, aligning the hole in the cover with the locating pin.
Repeat steps 1 - 4 for RTT2.