Time: 10 minutes
Analyzer mode: Standby
Wear personal protective equipment.
Use universal precautions.
|
|
||
|
Time: 10 minutes Analyzer mode: Standby |
Wear personal protective equipment. |
|
Follow this procedure to replace SPP and RPP probes not equipped with crash detection.
Note
For dilution probes equipped with crash detection, go to:
Replacing DPP probes - with crash detection
|
1 DILUTION PROBE (DPP) 2 SAMPLE PROBE (SPP) 3 REAGENT PROBE 1 (RPP1) 4 REAGENT PROBE 2 (RPP2) |
Put the system in Standby mode.
 Caution
To keep from damaging the probe tip when the power is off, you must manually support the probe and be careful not to strike it against anything on the analyzer.
Cover the cuvettes, wash cups, and other analyzer surfaces with lint-free towels to catch any screws that might fall.
Lift and manually rotate the probe to an accessible location.
|
|
Probe |
Accessible Location |
|
|
Sample probe (SPP) |
Over the dilution tray (DTT) |
|
|
Reagent probe 1 (RPP1) |
Over reagent tray 1 (RTT1) |
|
|
Reagent probe 2 (RPP2) |
Over reagent tray 2 (RTT2) |
|
|
|
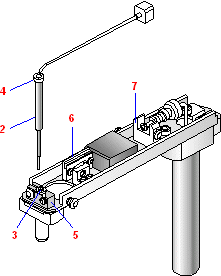
1 TERMINAL 2 2 JOINT HOLDER 3 KNURLED FITTING 4 SETSCREWS 5 PROBE TUBE |
|
|
2 PROBE TUBE 3 GUIDE HOLE 4 FLANGE 5 TERMINAL 1 6 TERMINAL 2 7 JOINT HOLDER |
|
To avoid damaging the threads or introducing leaks or air bubbles, do not cross thread or force the knurled fitting in too far. |
||
Replace the probe-arm cover and tighten the two probe cover screws.
Lift up the probe arm to the end of its travel. Manually rotate the probe over the probe wash cup but not within the wash port.
Put the system in Operating mode.
From the Menu Panel, select Maint., then select User maint. In the Probe posi.adjust area, select Position adjust start.
All probes (DPP, SPP, RPP1, and RPP2) move over cuvettes.
Using the User Maintenance window
Ensure that the probe is perpendicular to the arm and centered over the cuvette. If not, call your local technical support provider or distributor.
From the Operation Panel, select Initialize to return the probes back to home (over the wash cups).
From the Operation Panel, select PRIME, then select PRIME 2, then Execute to ensure proper water flow through the probe.
Note
Make sure that no water is leaking from the knurled fitting.